Wednesday 3 January 2018

Happy New Year!

Welcome 2018!

I always love the anticipation of a brand new year and the dreams we have for it.  As I indicated in my last post, this year I intend to reclaim my life in 2018 and part of that includes getting back to crafting and blogging.

So, where to start?  There's not been much progress in the way of miniatures recently so I thought I'd start by trying to finish off those little projects that have been sitting on the shelf for way too long and to show you those that did make it past the finishing post but which weren't shared with you at the time.

Firstly, here's a little quarter scale (1:48) cottage from Petite Properties.  It's called 'Post Office Cottage'.  These little kits are a joy to work with as the pieces are so precisely cut and the detailing is amazing.


It was externally painted, given a 'thatched' roof (made from a nylon pan scourer ☺) and landscaping added.  Can you see the post box hidden in the foliage?


Internally it was wallpapered and floored.  I've yet to furnish it properly - the items you see in the house definitely need some tweaking to make them look better!


I love the old telephone box at the side too - have a peek inside ...


I have another Petite Properties kit to finish which I plan to share with you next.  So until next time ❤


Friday 22 December 2017

And so another year draws to a close ...

Has it really been 15 months since I started work on Mimosa Cottage?

I had hoped to be posting regularly about the building of this house but again I've found that my creativity has been sapped by life events.

So ... a new year is about to start.  As a family we are strong and are feeling happier and more positive about the future than we have in a long time.  I want to go back to who I was but I know that I've been changed by my experiences over these past years so that can't happen.  Instead I will be embracing 2018 with an open mind and intend crafting to my hearts content.

In case you were wondering, Mimosa Cottage did get finished but I'd lost heart with it so it was simply wallpapered and floored.  I didn't install lighting figuring that when I sold it the new owner could install battery-operated LED lights.  In the basement I did some structural work and made it into a huge kitchen.  I made all the cabinets from mount board and sticky-backed plastic and was really pleased with the outcome.  Here's a few photos of the finished article.


Over the holiday period I will have a think about what I want to achieve in 2018.  It includes dolls houses (of course!), some stitching, some beading and anything else that takes my fancy.  Oh and blogging too - must do better 😊

May I wish you all a joyful and peaceful Christmas and I sincerely hope that 2018 brings you good health and every happiness for you and your loved ones ❤

Saturday 3 September 2016

A New Dolls House is born....

Hello again and thanks to Wendy and Jenni who left comments - it feels lovely to be back in the fold :)

Well Mimosa Cottage has been unpacked - I'd forgotten how many pieces there are in a dolls house!


I've built it but haven't glued it together yet because I remember from experience all those nooks and crannies that become inaccessible once the glue sets!

I've decided that this will be a cosy little Bed and Breakfast establishment and have renamed it Honeysuckle Cottage (mainly because that was the only house name sign that took my fancy when I last attended a dolls house fair.)  So Honeysuckle Cottage it is.  The basement will house the kitchen, laundry room and have a comfy sofa for the owner to rest on after attending to her guests.  The ground floor will be the breakfast room and guest lounge.  Two bedrooms with en-suite bathrooms on first floor and owners bedroom and bathroom in the attic.  There is also a little courtyard to the front of the property for use by the owner.  I think we'll start with the basement and work upwards.

First thing I wanted to do was enlarge the door between the two rooms so out came the hacksaw and in went the french doors.  Really (not) looking forward to painting those!


I also wanted the house to feel as though it 'worked' as a proper house so decided to install features to give the illusion of further spaces - do you know what I mean?  A staircase leading upstairs, the impression of a bigger room glimpsed through an open door, that sort of thing.  I had a load of MDF stairs left over from a previous project so with some lolly-pop sticks, spindles, MDF scraps and some paint here's my first Ta-Dah moment in a long time ....


I'm really please at how this has worked out.  The photograph shows it where it will eventually be fixed in place but I plan to add a false wall to make it look as though it's going further up than the eye can see.

I've acquired a resin cooking range which definitely needs some TLC to make it look more realistic and a fabulous fridge freezer that I am soooo looking forward to filling with all those miniatures I have that haven't seen the light of day in years.

Happy crafting, until next time! xxx

Friday 26 August 2016

Hello Old Friends....

... and how lovely it is to see that some of my favourite bloggers are still around.  Sad though to note that other bloggers seem to have stopped sharing their craft with us but as I know only too well life events have a habit of overtaking us sometimes.

Over the past four years or so I've simply not had the time that I used to have in which to indulge my hobbies due to family bereavements and caring responsibilities.  But I need a life too ... right? ... so now I am ready to rekindle my love affair with dolls houses and all things miniature.

Since last here I have sold my largest dolls house, The Laurels, downsized my collection of miniatures, cleared out my stash of all those little bits and pieces we keep 'just in case' and tidied my craft room in preparation.  It's exciting!!

As before I still have a list of smaller projects that are in various stages of completion and, as I have been without a 12th scale dolls house for at least two years, I am itching to start on a brand new kit which has been gathering dust for such a long time.  It's the Mimosa Cottage and Basement from Dolls House Emporium.  It's a 'Quickstyle' kit meaning it's decorated externally and painted white inside.  Looks pretty enough but I've a feeling there might be some alterations in the future!

Oh, it feels like I'm starting this blog from the very beginning so lets put the past behind us and move on.

I am so looking forward to sharing my miniature endeavours with you all again and would be thrilled to hear from anyone who is still following my blog - even through the wilderness of the past few years!

Mini hugs to all xxx

Saturday 2 March 2013

Spring Inspiration!

Hello everyone! Inspired by Carol over at Wee Cute Treasures blog I have a new found lease of creativity.  Like her I am adamant that I am not buying any more craft supplies until I have used up a lot of what's lying around.  I think I've overdosed on craft products in the past and this just leads to me feeling weighed down by the amount of things I want to do.  So, with it being the start of Spring, time for a spring clean and let's bust that stash!

First to go is my hotch-potch basket of wool.  I have now imposed a ban on the acquisition of wool, unless I have a specific project for it!  So here's what's finished so far...

I have made a crocheted scarf,
Made from King Cole Riot DK

and a knitted cowl,
Made from Sirdar Snuggly 3ply

and a beret with cowl to match,
Made from Patons ColourWorks Aran


and a crocheted shawl (still needs blocking a bit more to get to the size I want),
Made from Patons 4ply cotton

And - wait for it - even some miniatures! I know!! It's been months and months since anything miniature was tackled!
 

There's a knitted blanket for a double bed and a knitted blanket and pillow for a baby, though photos for these are a bit poor :(


Whew! That's enough for now.

There are still some half-finished things lying around so I'll crack on with those and be back soon with the photos.

Enjoy your weekend xxx

Monday 31 December 2012

Hello Fellow Bloggers!!

Hello everyone!  What a rollercoaster 2012 has turned out to be!!  I've been caring for family members and generally running everyone else's lives while they've been incapacitated - happy to say that I've now handed them back the reins with instructions to get on with things!

We also thought it would be a good idea to do some major renovations at home but this proved to be a stop-start affair because whatever we planned was always railroaded by something (or someone!) else.  Things are starting to settle down now and I'm tentatively starting to craft again.

I note that I have only managed a paltry five posts this year so far...must do better! 

I've also noticed that quite a lot of the bloggers I follow seem to have been side-tracked this year too so if that's the case with you I sincerely hope that you're back on an even keel soon xx

So - what have I been up to?  Making things mainly for other people...

A Roman blind for my sister's house...

And a bench cushion to match...

Untitled

A cross-stitched cushion for my son's girlfriend (it was her Christmas gift!)...

Untitled

A cross stitch 'Row of Cats' for a work colleague for her 50th birthday along with a cover for her Kindle - both of which I forgot to photograph!!

A couple of cross stitch kits made it back onto frames, one is a Cocker Spaniel for my sister that I started two years ago before remembering that I hate Anchor kits!  I had intended to give it to her as a gift at Christmas but it's more likely to become a birthday present - her birthday's in September!

Anyway that's enough for now...if you're still reading you must be longing for this post to end so I'll say bye for now and will definitely be back soon.

Wishing you all good health and every happiness in 2013!

Wednesday 8 August 2012

A quick check-in!

Hello Everyone and a special welcome to my new followers!
There has been so much happening here lately with home and family that hobbies have been shelved meantime.  However I feel the winds of change and am trying to work out the best way forward for us all.
Please keep your posts coming because I do try to catch up with reading them every few days.
Hugs to all,

Wednesday 13 June 2012

Comment Verification ..... why?

I have been driven mad by the "type-what-you-see-even-though-it's-illegible!!" piffle I have to go through to leave a comment on your fabulous blogs.  Checking the settings on my blog I noticed that it was switched on here too!!!  It is now disabled!!
If others are as bothered about this as I am (and it's not just me being 'at-that-age'!!)  could you please switch it off?   Rant over xoxox

Sunday 13 May 2012

Bedroom & Dressing Room

Spurred on by your lovely comments I've finished the master bedroom and converted what used to be the wasted space of the staircase into a dressing room.  Because the carcass had half-landings built in the only way round this problem was to add a false wall in front of the landings resulting in a small but functional area.  The false wall in this room is meant to look like a wardrobe :)


I'm not sure that the style of furnishing in these rooms suit the overall feel of the house but until I revamp the other set of furniture I have it'll do for now.

Hope you like it so far!  Back soon x

Thursday 3 May 2012

It's been such a long time....

It’s been such a long time since I’ve posted anything and I feel I have been away from blogging for what seems an eternity due to every conceivable ‘life stressor’ landing on my lap en masse since the start of this year. However on a positive note there is a glimmer of light at the end of the tunnel now and immersing myself in all things creative has certainly helped me through. So after a quick scroll through my blog to help my memory, shall I start with an update of what’s been achieved in my miniature world of late?

Just after Christmas, and after much heart searching, I had decided to part company with my Laurels doll house. I hadn't worked on it in a year, it takes up too much space and I really couldn’t see me finishing it. I started to strip out anything I wanted to keep with the intention of selling it ‘sold as seen’ but I never got round to advertising it for sale. Perhaps that’s just as well as one day I rolled up my sleeves and just started working on it like a maniac…although now slightly regretting that I had stripped out the wiring!!

The Laurels is a five storey townhouse with five large rooms and five narrow halls / staircases. I decided that the staircases were a complete waste of space and with some ‘bashing’ it now has nine rooms and one entrance hall. It then crossed my mind that the little people wouldn’t be able to move around the house!  Hmmm...I decided it’s my dollhouse and if I think that doors are not a necessity then the house will just have to be viewed as a series of room boxes!! Besides which I have other houses-in-waiting in which the flow of movement around a normal house can be established!

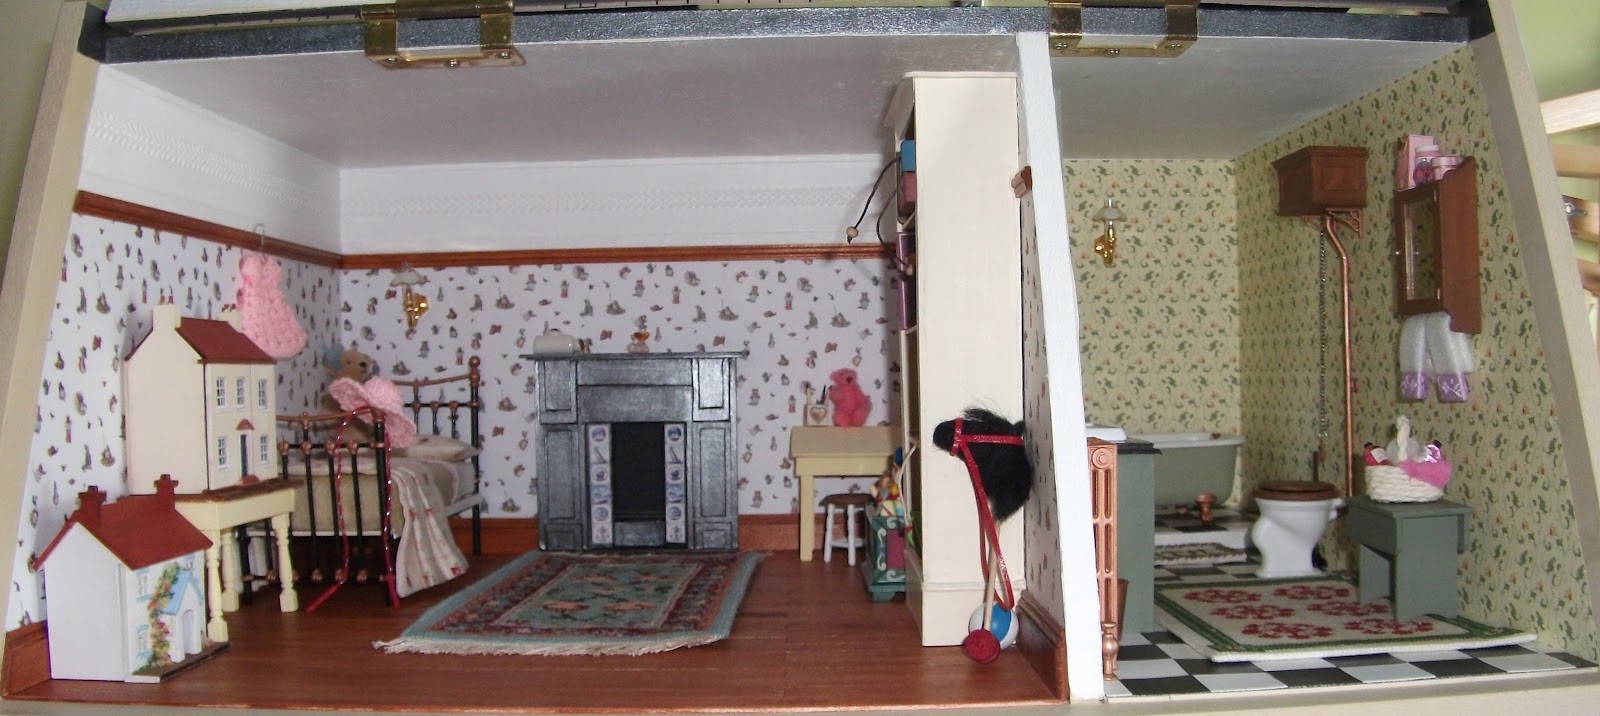
So as not to bore you to tears I’ve split the unveiling of The Laurels into a number of posts. So let’s start at the top of the house; on the left is the nursery and on the right is the bathroom.


You’ve probably already seen a lot of the miniatures in the nursery. The main difference is the doorway has now been covered with a huge shelf for toys, books and games. The 144th scale houses I made previously now have a home, at a recent fair I bought a little desk that you can see to the right of the fireplace and the light was reinstated above the bed.


It’s at the stage now where I can continue to make or buy miniatures to fill the gaps in the room.

Moving across, the bathroom was actually the top hallway. As the house originally had dog-legged stairs there were bits of half landing built into the carcass of the house. This wasn’t too much of a problem at the top but, as you’ll see later, it caused some difficulties with the rooms below  A piece of foam board was cut to fit the hole in the floor and the room was tiled with some black and white tiles that I bought ages ago, finally glad to have found a use for them! The bathroom suite was a Chrysnbon kit that I made a while back and blogged about then – I just love these kits!


The room was too narrow to build another shelving unit so I used mountboard to build a vanity unit into the old door frame and inset the sink from the kit.


I intend to buy a Chrysnbon bathroom accessories kit and add them to the room too along with some shelving and, of course, loads more miniatures.

So, that’s the top floor. Next time, and I promise it will be soon, we’ll move down to the master bedroom … with dressing room! Until then, take care xx


Sunday 1 January 2012

Welcome 2012!

Well, that's another year over and a new one just about to start!  I don't want to reflect too much on 2011 as it wasn't the happiest of times so let's leave it in the past and focus on the future.
I was absent from my blog for much of 2011 but I fully intend to remedy that in 2012 so I would like to start by sending a warm welcome to all my new followers and extend thanks to those who are still following despite the lack of posts!

Here's to a Happy, Healthy and Peaceful 2012!!

Tuesday 1 November 2011

Furniture Revamp

Well it doesn't seem that long since I last posted but it's over a month ago..where did that time go??? Anyway real life has been meddling in my miniature endeavours so I've not done a great deal of late, however whilst having a clear out of miniatures I came across various pieces of mismatched bedroom furniture. A dressing table that had lost it's mirror and was a ghastly red mahogany colour, a pine wardrobe that the door had fell off, a bed that had been 'dressed' previously (but was a bit naff to be honest) and a chaise which was a wee bit small for 12th scale but fitted across the bottom of the bed. Rather than give them their freedom I decided I would revamp them. I forgot to take 'before' photos but here is the result of a week's painting, sanding and general tweeking.


I've still to add more items inside the wardrobe and finish the bolster cushion on the bed but otherwise I'm very pleased with them. The rug is one of my own designs and has a matching cushion on the chaise. And I don't know if you can see the detail on the bedspread but it is so pretty - it's tiny dandelion 'fairies' blowing in the wind with some script that's so small I can't read it.

As yet I don't have a home for them so I'll keep them in reserve for a future project. Hugs to all that need one x

Monday 26 September 2011

Bad Blogger!!

Hi Ladies and thank you for your lovely comments which I appreciate x

Blogger is not playing nicely and won't let me post a reply to your comments!  If anyone has an idea on how to remedy this please let me know.

Eva, the kit is from http://www.petite-properties.com/ and costs £12.99
Hope that helps,


Hugs to all xxx

Saturday 24 September 2011

Love, love, love this tiny cottage!

Thanks for your comments on my last post.  As promised here is an update on the 144th scale cottage - well I've finished it actually but forgot to take photos of the in-between stages!!
I've done a couple of 144th scale houses before - both were much less sturdy, a lot more fiddly and a heck of a lot more expensive than this little treasure.  The detail is outstanding for the price.  It even has tiny chimney breasts, fireplaces and glazed windows.

Washtub Cottage 144th scale
It went together really easily.  I decided to wallpaper the interior as I had some left over from a previous project.  And as it is destined for display in a 12th scale dolls house I didn't bother weathering the exterior.  There are more houses in this 144th scale series and I will definitely be ordering another.


I'm really pleased with how it turned out and hope you like it too!


I can feel my creative juices flowing again so in a logical progression I'm going to start on a 48th scale house next that has been lying untouched for almost 18 months.  See you soon x